Sunday, November 28, 2010

Challenge #2- Seeing green...tea.

Instead of waiting every 4 posts to do a challenge, both Maggie and I had so much fun with the first one that we decided to do a challenge every 2 posts. So we'll see how that goes!


This time around we are using green tea to make up any concoction. I blanched at first when Maggie suggested that this be the challenge--- I was so stuck and bewildered that I can honestly say that I wasn't sure if I could accept this challenge. I didn't even know where to buy matcha powder. But I did anyway.


It took me a full two weeks to find the right idea for this challenge. Among the rejects (and they were a bizarre lot) were: green tea ravioli, green tea pasta and green tea sauce. Uhhh.. gross. But then I thought, Green tea mousse! And that was brilliant, until I realized I had no idea how to make mousse and had never used matcha powder. I wasn't really ready to take that leap.


But then... one thing led to another, and I present today:


Green tea creme caramel (also known as flan):

Ingredients:
Matcha powder.. no English
1/3 cup sugar
3 tablespoons water
Butter for greasing
3 large eggs, plus 1 egg white
1 cup whipping cream
1 cup skim milk
1 tsp vanilla extract
1 tsp fine grade matcha powder
         NOTE: I had a hard time with the matcha. You can buy it at your local asian supermarket in the tea section.  Unfortunately all the packaging is in Japanese. And nobody that I know well enough to get matcha for me is Japanese or reads Japanese. The only label in English said 'Ingredients: GREEN TEA'.So I did what any logical person would do. I felt the packages. I noticed that some were different prices than others and that some felt different. Some felt grainy and others were finer. I went with the finest (and consequently, most expensive) matcha there was. I reccommend getting the finest you can find. Nobody likes grainy dessert.
2/3 cup sugar
pinch of salt

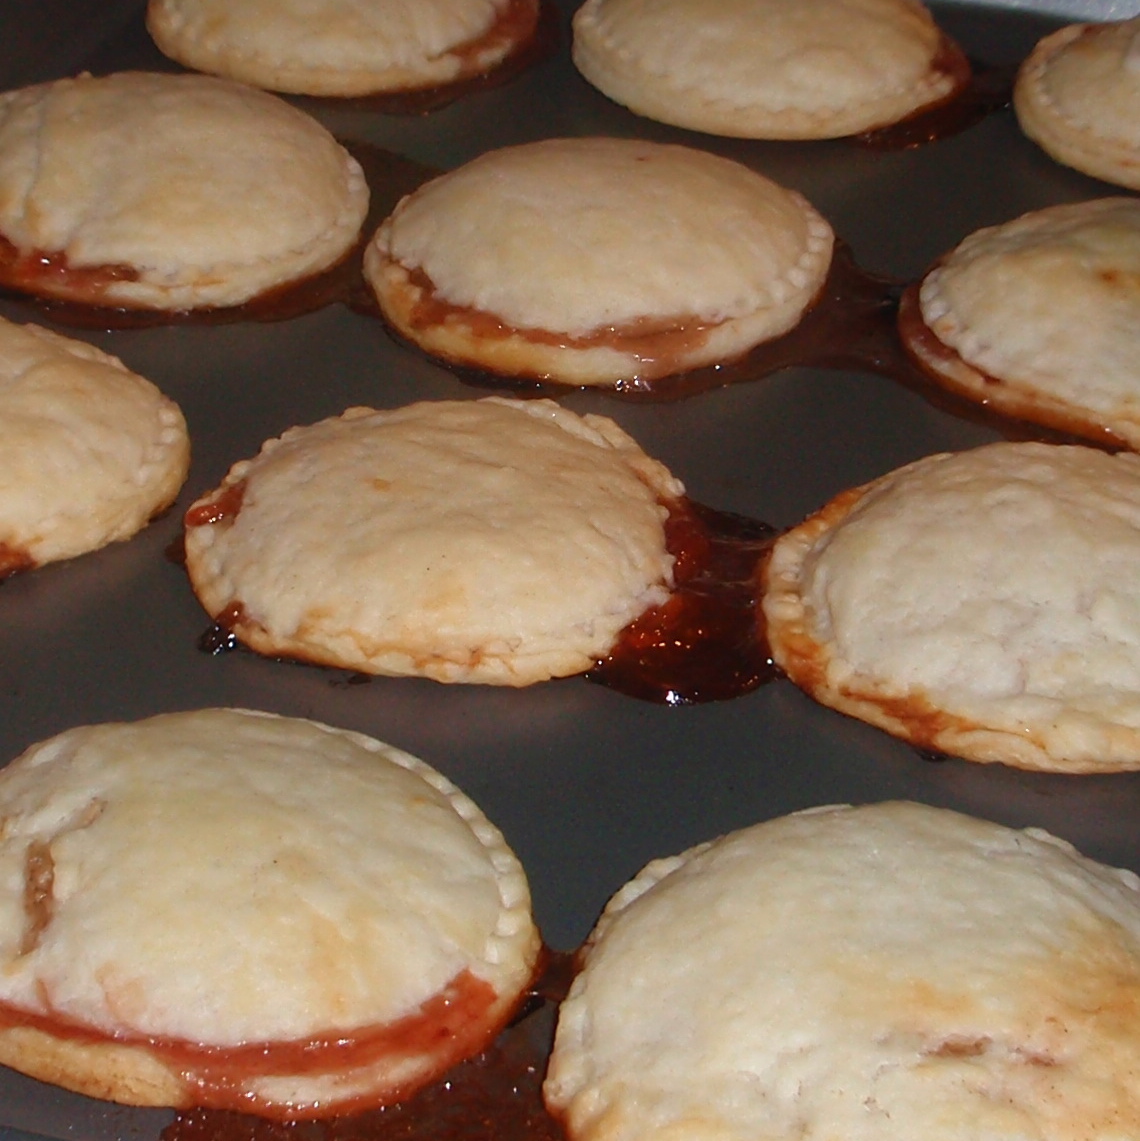
Start by dissolving 1/3 cup sugar and water over medium heat, stirring constantly until the mixture is tinted golden brown. Pour into buttered ramekins (I used 2 large ramekins because that's all I had, but you can do six little ones) until bottoms of ramekins are coated. Set aside.

Before the bake
In a large bowl, whisk together eggs (and extra egg white), vanilla, milk, cream , sugar, and salt. Once combined, take a small amount of the mixture and blend it together with the matcha powder for even green tea distribution, mixing it back into the bowl when fully blended.

Distribute mixture into ramekins evenly and place into baking dish. Pour water into the baking dish until the water reaches about an inch deep. Bake at 350 degrees. If using two large ramekins, bake for 1 1/2 hours. If using six small ramekins, bake for 45 minutes. Let chill for at least 3 hours.


Once chilled, unstick edges with a knife and tip 
upside down. Watch for liquidy caramel! So tasty! Ok. No it doesn't look pretty. But it really does taste good, I promise!


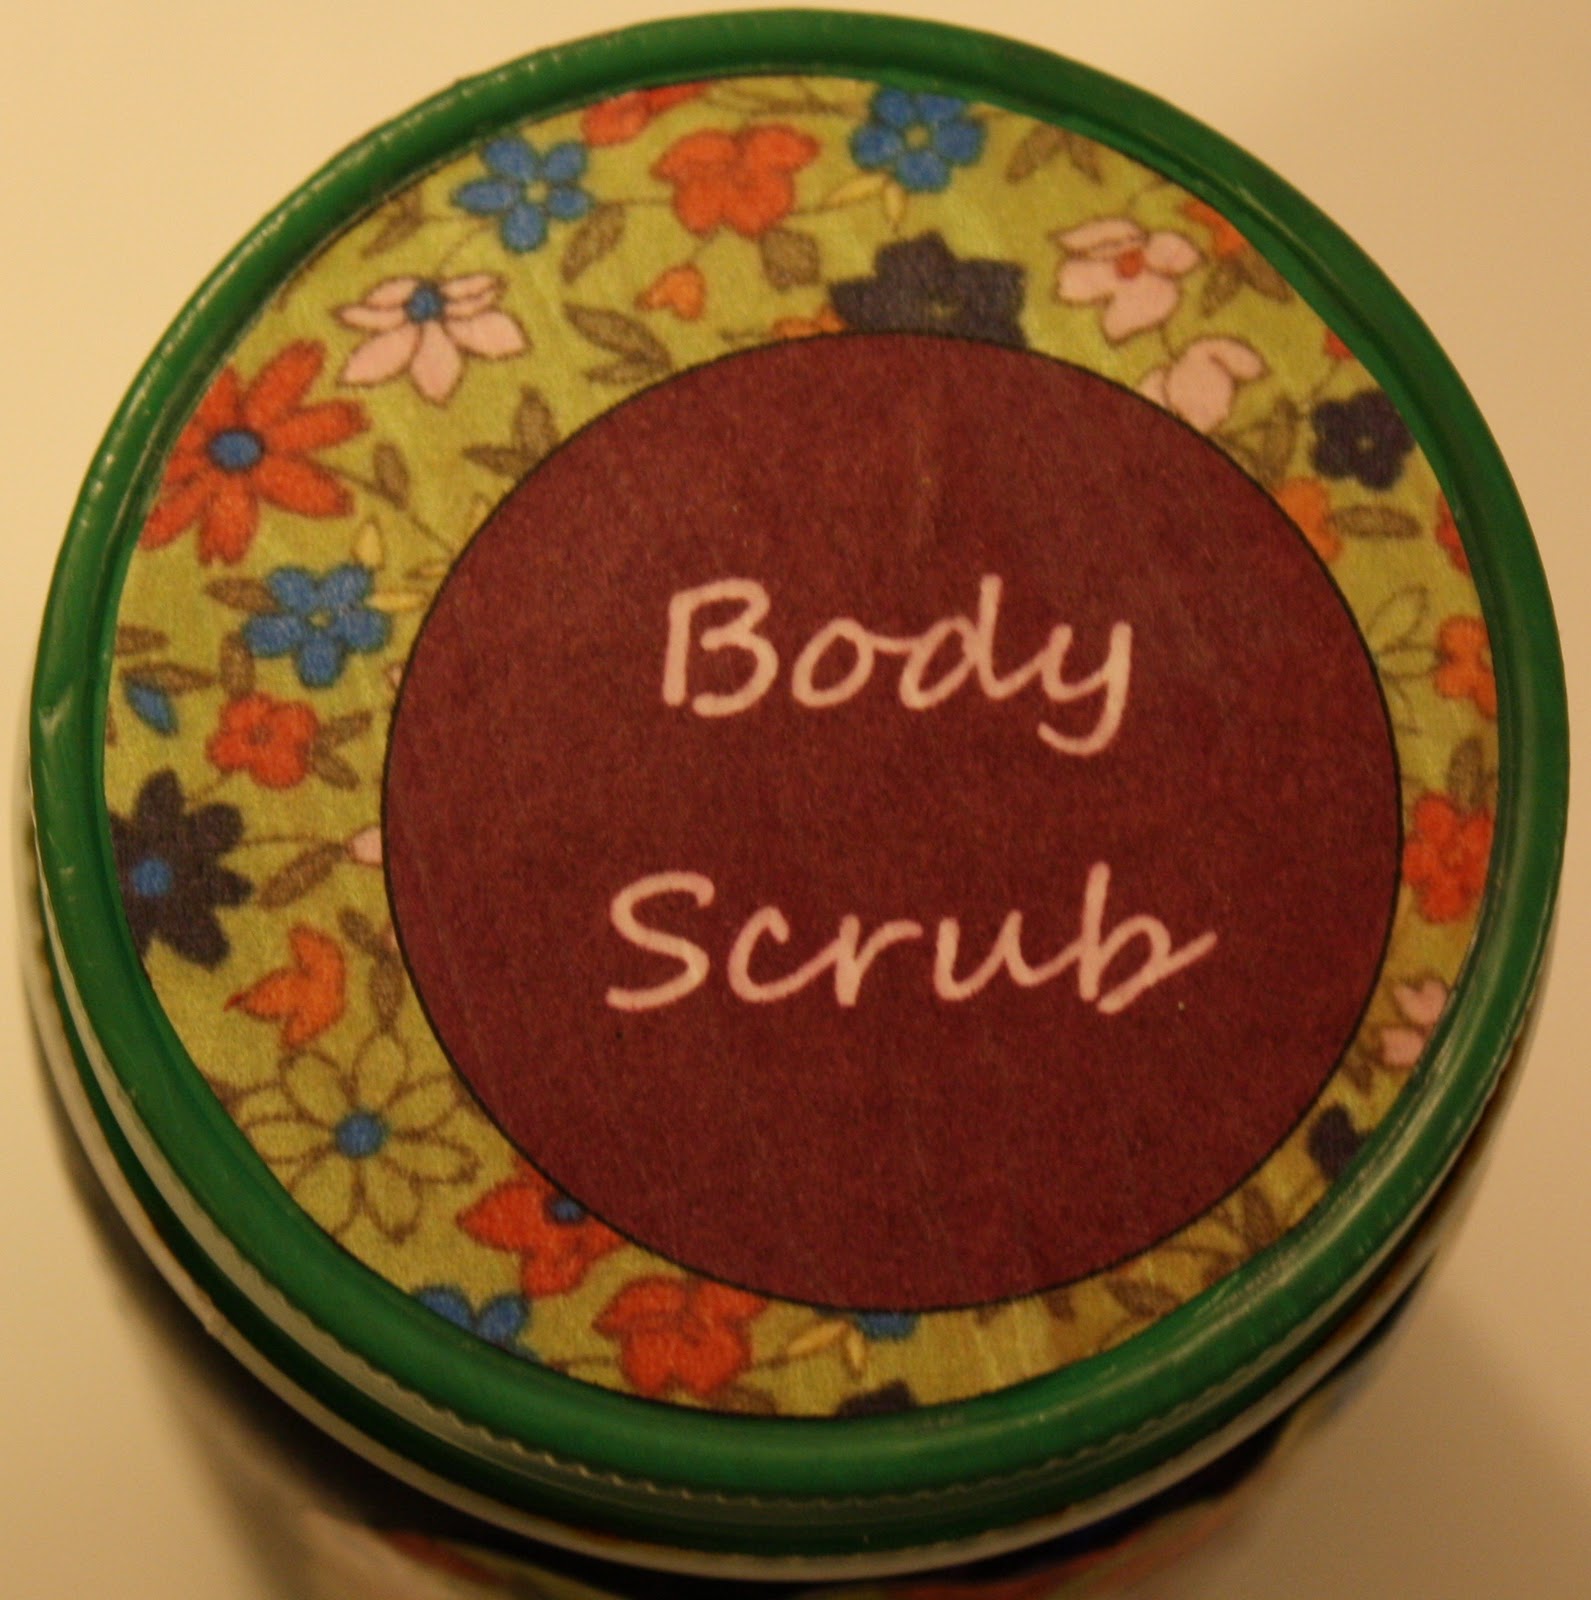
I found it funny that Katelyn was so uneasy by this challenge, because it was originally her idea!! (Yes, Katelyn, check our messages, you were the one to first bring it up =) NOTE FROM KATELYN: I remember throwing this challenge on the board... I just never expected to be voted on so soon! Also. I thought that I would have a better idea by the time we came to this challenge.. whoops!).  I was pretty excited because I already had a green-tea craft in my repertoire.  So unlike Katelyn, this challenge was fairly easy for me…  So I present to you a green tea body scrub.

Materials
  • 1 cup sugar
  • 5 tablespoon Epsom salt
  • 8-12 teaspoons of olive oil (if you have oily skin, I suggest using less…If you have dry skin, I suggest using more)
  • 2-3 teaspoons honey
  • 2 bags green tea
  • 2 bags lemon green tea
  • Small palmful of crushed mint
  • Small palmful of rosemary
  • Bowl
  • Spoon
  • Jar with lid (I used an empty, thoroughly cleaned out salsa jar.  I had previously decorated it with spray paint & acrylic paint)
This is a fairly customizable recipe...You can use fresh lemon zest, but only if you indeed to use the scrub immediately (the zest can mold over time).  Or you could use orange or lime zest (I would be curious to see how well a green tea, lime, dried basil scrub would turn out...)  You could also add Vitamin E, essential oils, dried flowers (I've used lavender before), etc.  This is the first time I have used mint and rosemary, I enjoyed the minty-fresh scent of the mint/rosemary combo.  I like this recipe because it's fairly dry compared to other homemade scrubs and it's convenient because chances are you have most of the ingredients (if not all of them) at home!
    Directions


    Pour sugar and Epsom salt into bowl.  Mix!


    Pour olive oil and honey into 
    sugar-salt mixture.  Mix!


    Cut open bags of tea, add to sugar-salt-oil-honey mixture.  Mix!


    Pour in mint and rosemary.  Mix!


    Put into jar.  Glue on labels (optional, see template, click on image, right click, "save image as" to save to your computer). 


    Perfect for a gift for a friend, or for yourself!  It smells minty and the green tea helps exfoliate to leave all skin types feeling nice and smooth.


    Sunday, November 21, 2010

    Giving Thanks

    Hello!

    Today I am excited to share with you three Thanksgiving crafts, all made (mostly) by my pre-Kindergarten class.  As a teacher (and a crafter in general), I really try make meaningful crafts that have equal parts form and function.  The process of making the craft should teach them something and the final product should be something the kids are proud of and want to show off. 

    Warning:  In this post, there will not be any pictures of the process of the crafts as a means to protect my funny little kiddos.  Also, the pictures are taken from a camera phone, so the quality might be a little less than usual. 

    First, a coffee filter turkey!  The purpose of this activity was to teach all the kiddos about colors and to conduct a mini informal assessment on their knowledge of colors and their ability to predict what will happen when we unfolded the coffee filters. 

    Materials:
    • Variety of colors of food dye
    • Bowls filled with water
    • Coffee filter
    • Turkey body from brown, orange or yellow construction paper (see template below if you would like a copy)
    • Scissors
    • Colored pencils
    • Two googly eyes
    • Elmer’s glue
    First, drop several drops of food dye into the bowls of water (we used green, red, yellow and blue).  Then, have the child fold the coffee filter several times (doesn’t really matter how, they can be creative).  Then dip the coffee filters into whatever colors the kids want to use in whatever order they want.  Open up the coffee filter and allow to dry. 

    Click on picture, zoom in once
    to see full size template.
    Meanwhile, give one turkey body to each kid (I pre-cut the turkey bodies from the template…My kiddos are not all experts with scissors yet).  The kids drew on a waddle and a beak, and then we glued on two googly eyes. 

    After the coffee filters are completely dry, use Elmer’s glue to glue the coffee filter onto the back of the turkey body. 

    Display in the hallway for parents and students to enjoy!


    Next, a fingerprint turkey!  This activity was primarily for teaching the names of the different fingers (thumb, index, middle, ring and pinky).

    Materials:
    • Ink pads
    • Paper (White, brown and orange)
    • Glue
    • Their hands
    • Fingerprint poem (see below)
    First, press pink into yellow ink, and make one line.  Press ring finger into yellow ink and make one line below the yellow.  Use the middle finger with blue, again press a line below the yellow.  Press the index finger into green and make one line below the blue.  Lastly, red is for the thumb, press one final line and one that stands out for the head and waddle (see picture below!).  Teacher/Parent/Adult draws in eyes, legs, wings and beak. 

    I glued the turkey print out on an orange backing.  Print out fingerprint poems, glue them to brown cardboard backing.  Glue poem onto orange backing, below turkeys and done!

    Fingerprint poem:
    All turkey birds are different,
    As you will shortly see
    And you will never see another bird
    Quite like this one to you from me.
    Can you see what makes it different? 
    Do you need some helpful hints?
    I made a turkey from my very own...
    FINGERPRINTS!!


    Lastly, a handprint turkey.  We did this project to support team work.  On the Tuesday before Thanksgiving, we are going to raffle the turkey off to one lucky winner!

    Materials:
    • White paper
    • Yellow, orange and red paint (finger or tempera…doesn’t really matter as long as it is washable)
    • Their hands
    • Scissors
    • Turkey body cut out on brown construction paper (see above)
    • Colored pencils
    • Tape
    Each student made two or more handprints (this was very supervised and they took turns to avoid inevitable messes).  Hang the paper up to dry. 

    Students cut out their own handprints (unless their motor skills aren’t quite up to par yet…I let my kiddos cut them out, then helped refine their edges).  Teacher/Parent/Adult assembles turkey body (draw on eyes, beak and waddle), then tapes together all handprints on turkey body.  Place on bulletin board underneath student’s “giving tree” with the things they are thankful for (see pictures below…My personal favorite was “I am thankful for…Velociraptors.”)


    Happy Thanksgiving.


    Sunday, November 14, 2010

    Tasty & Dairy-free = happy tummies and happy guests

    This past week, I had cousins come over for a delightful board games evening. It's a great, low key excuse to see people you live near but don't necessarily see often (or at all). Being a full time student with a part time job can get fairly tricky and extremely draining - never mind the fact that I hardly have time to do homework and blog - so having people over was a bit daring in regards to my schedule.

    But it trumped having NO social life, so it was a go. I cheated a bit-- I told them to come after dinner (I didn't get home until 5:30 that day) and I would provide tea and dessert. I had to be careful, though: Some members of my family are lactose-intolerant and pretty sensitive to any form of dairy. Even butter baked in the crust of things - which was definitely challenging, as all the desserts in my repertoire required butter, or sour cream, or yogurt, or milk, or cream, or cheese...

    And remember, when preparing these I was short on time and needed something that was either quick or something I could make in advance and pop into the freezer until I needed them.

    So after weeks of thought (yes it took weeks) this is how it all went down:

    Pop-Tart Pockets
    (Yields about 30 palm-sized pastries)

    Crust:
    1 454g package of Tenderflake shortening
    1 egg
    1 tablespoon vinegar
    2 teaspoons salt
    5 1/2 cups all purpose flour (plus extra for rolling out the dough)
    water

    This recipe is also on the packaging of the Tenderflake box, however unless you didn't know beforehand, you might not have thought to pick up vinegar, so voila.

    Mix salt and flour together and cut in the shortening with a fork or pastry blender until resembling coarse
    crumbs.

    Combine egg and water in a 250 ml/1 cup measure. Once combines, fill the rest of the measuring cup with water until the cup is filled (don't go over 250 ml).

    Mix wet and dry ingredients, forming a nice dough ball. Chill out in the fridge (the dough, not you. This recipe isn't difficult enough for that). Actually, I found that using this recipe yielded extremely easy, delicious pastry to work with- even better than using a butter crust. I know people who are adamant about pate brisee butter crusts, but an aunt of mine uses all and only Tenderflake. No compromise.

    While you're dough is cooling off, prepare the filling...

    Filling:
    Strawberry jam
    3 medium apples - I used Gala apples
    1 teaspoon cinnamon
    1 lemon
    2 tablespoons sugar

    Cut up the apples into really small pieces. Smaller than dice. As small as you can get without getting frustrated. Mix in a bowl with lemon juice of 3/4 of the lemon, sugar and cinnamon.

    Now you can get to work!


    Roll out dough on a floured surface with a floured rolling pin. Cut circles (or rectangles, whatever) about the size of your palm. I used a little sandwich press thing that my mom has had for a long time but never used (terrible waste of money, until now) but you can use an appropriately sized cookie cutter. On each circle, spoon a small amount of jam into the centre followed by a small amount of apple mix. Cover each with another circle of dough and press edges together. You now have pop-tart-like pockets!

    They can be frozen at this point. Just be careful with these little guys, They are delicate and can leak, so make sure you've pinched all edges very well and don't smush them in the freezer. Seal them up air-tight if you can- they'll be ok for a day if you don't, but if you want to make them well in advance for a 'just-in-case' or 'i-have-no-time!' dessert, freezer burned pastry is gross. So. Baker beware.

    When you're ready to bake them, pop them into the oven on an ungreased cookie sheet at 400 degrees F for 20 minutes or until pastry shows some browning. While baking, make the icing. Warning: the pastries will leak a bit, as shown. No big deal.


    Icing:
    2 cups icing sugar
    1/4 remaining of the lemon, juiced
    3 tablespoons hot water

    Mix all together until you get a nice icing consistency (you might have to play around with the ingredient ratio here) and drizzle lemony icing over hot, flaky pastry.
    Done. Your guests will go back for thirds, possibly fourths. I got tons of compliments! If dairy is not a concern, try making a cream cheese icing. Then your guests will worship you. And nobody's tummy will hurt!

    Yum.

    Sunday, November 7, 2010

    Challenge 1: dollar store hostess gift


    As a part of this blog, the two of us have decided to break up the posts by having a challenge after 4 posts. And a challenge it was! The challenge this time was to create a host/ess gift for under $10 (not including tax) at the dollar store.


    The essence of this challenge was to produce a low cost, yet impressive gift for a host/ess that you didn't particularly know well and didn't want to spend a ton of money on (yet still impress and not LOOK frugal)


    5 previously owned items could be used but they must have been in our possession for at least 1 month prior to the challenge date. We also got to use as much glue and our scissors as much as we wanted. This challenge didn't start out so black and white. It took us a while to be on the same page about this challenge and it's details, but here are the results (and aren't they marvelous??)

    Katelyn:


    What I wanted to do for a HOSTESS gift required materials that were pretty much out of the dollar store range. Not by a lot, but I didn't previously have things like spray paint, rubber stamps, etc, which I acquired much later. However, it didn't really jive with the challenge  because I was buying these things with the challenge in mind. Which really made it.. not so challenging. So I had to reconsider.


    I went back to square one and to the most basic gift idea that I had. A notebook. Because, who doesn't like customized stationary? I was always jealous of the Annas, Katherines and Jessicas because at the dollar store they could always find a pencil or key chain with their name on it. Always. With a name like Katelyn, it was very rare. Even now, Blogger is assuming my name is some sort of typo and putting a red line under it. Hmph.


    So custom stationary it was. But then I had MORE trouble. I can't really customize a pen, and what else could I possibly do? After wandering the dollar store for about 2 hours, it finally came to me (in a panicked rush, as I didn't want to be late for yoga). File folder and bookmark. Done. Another difficulty- This challenge didn't allow me to use a stamp set I had been counting on, so labelling the set was another problem. I grabbed a gold paint pen, cardboard label frames, and I was done. Oh and by the way? The dollar store I was at had sold items that were more than $1!


    Items from the dollar store:
    • Hardcover notebook (NOT spiral bound)
    • Scrapbooking paper, 12" by 12"
    • Gold paint pen
    • Spool of fabric ribbon
    • Small file folder
    • Decorative label frames and tags
    Freebies (things I already had that I was allowed to use)
    1. Sewing needle and 'invisible' thread (looks like skinny fishing line, couldn't find thread same colour as ribbon. At first needle and thread were going to be two items, but then I thought, how can you use one without the other? You can't really, not to sew. It's like having one scissor arm without the other.)
    2. Card stock, 1 sheet
    3. Buttons (2)
    4. Hair elastic (unused)
    5. Sharpie pen
    Because this post is already word heavy, I will just put up the pictures. I think you'll get the point.


    A word about this project though: While it is great, MAKE SURE TO SPELL THE HOST'S NAME RIGHT. Seriously, double check. Because otherwise you end up embarrassing yourself and the recipient. You know how I know this? Because a lot of people don't get MY name right. And that really sucks. And then I don't have the heart to tell them. And then they continually spell my name wrong forever. This happened with the GM of a company I used to work for...But onwards...

    The raw materials
    Creating the book jacket, make sure to glue everything, including the crease of the spine. Then tuck and glue everything in, including the spine. You might have to cut some flaps so that your corners don't bunch up.
    Afterwards, securely glue a sheet of card stock over all of the flaps and creases on the inside. You can also add pockets!
    Tuck in the corners of the scrapbook paper to make a pocket, gluing the flaps onto a piece of card stock and glue the card stock backing directly onto the card stock of the inside cover.

    And glue tabs wherever you like!
    Using the gold pen, I 'painted' 2 tags so that they had a gilded look. They were also patterned underneath and I didn't want pattern clash overload! These will go on the cover of the file folder and notebook.

    A brilliant bookmark idea, modified from Mary Janes and Galoshes . I made mine adjustable by adding 2 buttons.
    Next, glue scrapbook paper onto the top of the file folder. Unfortunately, mine yielded terrible, ugly glue spots on the reverse after it dried. What should I do??
    Of course! Cover it in paint-pen ink! I coloured it in and glued a band of ribbon across to tie the whole gift together. I only glued the ends and the middle to create a place to tuck small papers. Functionality, yay!
    The finished product! A joy to make, taking only about 2 hours.  You can totally make it in advance for a quick present on-the-go. Love it!


    --------------------------------------------------------------------------------------------------

    Maggie:  This was a sizeable challenge for two reasons.  (1)Find something that all people need or like and (2) find the materials at a dollar store.  When I was in the brainstorming process for this challenge, I tried to think of universal human needs…   Food, shelter, etc etc etc.  Then it occurred to me that instead of thinking of universal human needs, I should be brainstorming universal human problems instead.  To which one thing popped into my mind—germs.  We all have germs.  This probably is the most prevalent human problem in my world because I am a pre-kindergarten teacher and my twenty-two kiddos constantly remind me how germ-y we are.  My kids aren’t very happy to share their toys, but they are more than willing to share their germs.   

    Back to the point, we all need to wash our hands (well, we all should wash our hands).  So, I embarked on a journey to my local Dollar Tree (where absolutely everything is $1.00 or less) with the function in mind (soap dispensing, germ killer!).  I had less direction in the area of form (how was I going to make soap dispensing, germ killer appealing to an unknown host?).  Fortunately, inspiration struck while I was at the dollar store. 
    I found an odd set of dispensers.  They had different lids, but the same type of base, so I decided oh well about the lids, it will work.  Also found a glass candle holder and a candle that was perfect because it matched the base color of the dispensers. Decided with a little TLC, these dispensers and candles could work...

    1. Soap dispenser (1)
    2. Soap dispenser (2)
    3. Candle holder
    4. Candle
    5. Crocheted doily
    6. Hand soap (1)
    7. Hand soap (2)
    8. 1 bottle of body cream
    9. 1 pack of acrylic paint (didn't end up using the paint, but did use the paintbrush!)


    1.  Modge Podge
    2. Acrylic paint (silver)
    3. Acrylic paint (blue)
    4. Sharpie pen
    5. Rubber bands (2)


    The How to...
     
    
     Paint lids
    
    Secure doily on soap container with two rubber bands
    

    With sharpie, trace the pattern of the doily onto the soap container.

    Paint design onto containers. 

    I wanted to make a two-toned design, so I repeated the steps of securing the doily, sharpy-ing the design, and painting the design with the contrast color.  Repeat steps for candle holder!!

    Pour lotion & soap into containers.


    As a final step, cover everything with a generous coat of Modge Podge to seal everything up.

    Helpful tips:
    1.  Pick a lotion and soap that are somewhat cohesive. 
    My soap was raspberry vanilla and the lotion was just vanilla...
    Thus, a theme of vanilla. 
    (And the candle was vanilla scented as well!)
    2.  Pick neutral colors. 
    If you do not know your host very well,
    pick colors that will nicely mesh with a
    typical kitchen or bathroom. 
    3.  Be patient. 
    The more time you put into the sharpy-ing and painting,
    the sharper the lines, the more professional it will look.

    So, when you put it all together...


    -----------------------------------------------------------------------------------------

    So...

    $10 at the dollar store + 5 previously owned items + as much glue or scissors as necessary = stationary set

    and

    $10 at the dollar store + 5 previously owned items + as much glue or scissors as necessary = soap/lotion set

    then...

    stationary set = soap/lotion set?

    I was never very good at geometrical proofs.
    Challenge 1.  Success.
    Blogging tips